How To Read A Friendship Bracelet Pattern
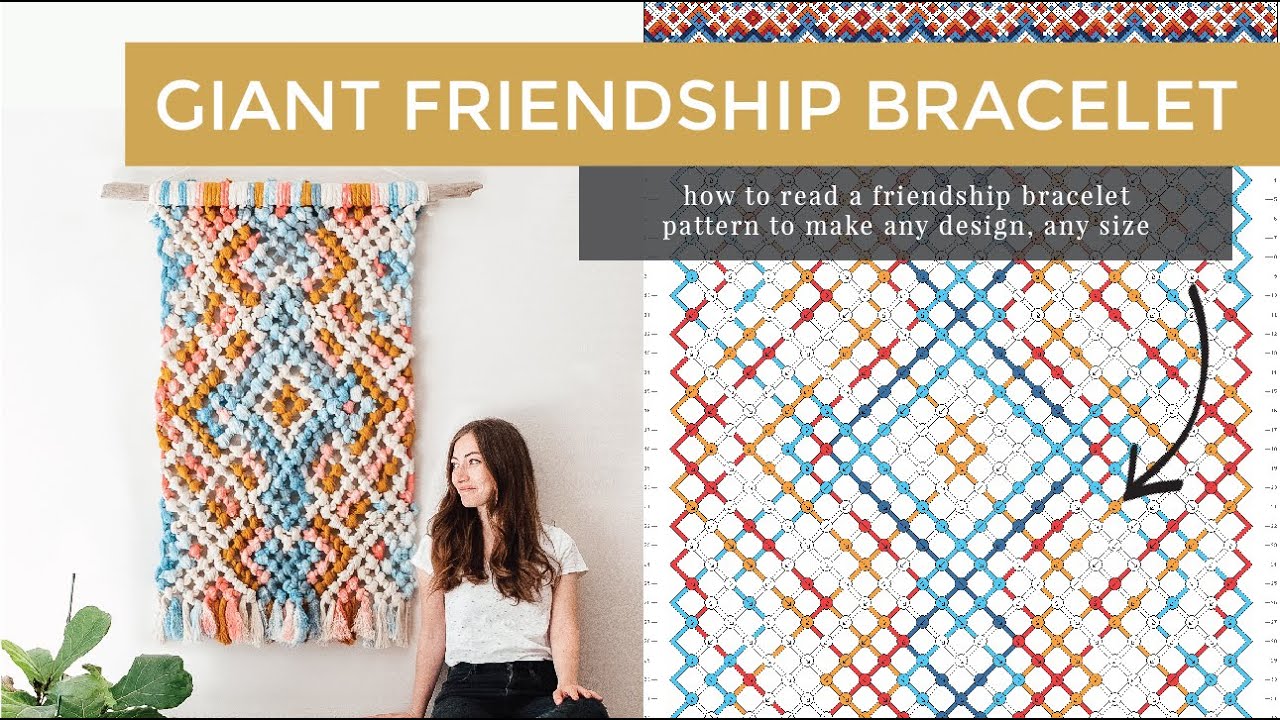
How To Read A Friendship Bracelet Pattern - In a 1:2 pattern, the. You’ll work through the pattern one row at a time. Web the vertical lines labeled with letters at the top of the pattern represent your strings, and the numbers on either side of the pattern indicate rows of knots. In row one, you tie each of the knots on your first row from left to right. Work with 2 strings at a time, as friendship bracelet patterns use pairs to create knots. You can also use a safety pin to secure the knot to your jeans. Typically i select my patterns based off of photos of completed patterns. The numbers on the sides indicate the rows. Tie strands all together with an overhand knot 3″ down and secure to fabric with a safety pin or to a hard surface with tape. If you read a pattern row by row, you will follow the pattern as if you were reading, from left to right. *remember, each knot in a friendship bracelet consists of two knots.*. Decoding the friendship bracelet pattern. You’ll work through the pattern one row at a time. Friendship bracelet patterns often consist of bubbles with arrows, each representing a knot. Web the vertical lines labeled with letters at the top of the pattern represent your strings, and the numbers on either side of the pattern indicate rows of knots. In a 1:2 pattern, the. You can search by keyword, like chevron, number of strings, number of colors, difficulty and all of that good stuff. You can use embroidery floss or thicker hemp or yarn for a chunkier look. You can choose to only see results with photos and then check ’em out. Tie strands all together with an overhand knot 3″ down and secure to fabric with a safety pin or to a hard surface with tape. Cut 32+” of omegacryl yarn or embroidery floss for each strand indicated at the top of the pattern underneath the capital letters. Once you do all of these knots, move on to the second row. Tie strands all together with an overhand knot 3″ down and secure to fabric with a safety pin or to a hard surface with tape.. Tie strands all together with an overhand knot 3″ down and secure to fabric with a safety pin or to a hard surface with tape. You can search by keyword, like chevron, number of strings, number of colors, difficulty and all of that good stuff. Web the vertical lines labeled with letters at the top of the pattern represent your. You’ll work through the pattern one row at a time. If you read a pattern row by row, you will follow the pattern as if you were reading, from left to right. Decoding the friendship bracelet pattern. Web the vertical lines labeled with letters at the top of the pattern represent your strings, and the numbers on either side of. Web the vertical lines labeled with letters at the top of the pattern represent your strings, and the numbers on either side of the pattern indicate rows of knots. The numbers on the sides indicate the rows. You can choose to only see results with photos and then check ’em out. Lay out the colors in your desired color. Web. In a 1:2 pattern, the. Typically i select my patterns based off of photos of completed patterns. Tie strands all together with an overhand knot 3″ down and secure to fabric with a safety pin or to a hard surface with tape. In row one, you tie each of the knots on your first row from left to right. Web. Alternate tying knots with the outer string around the base string to give this bracelet design a zipper look. In row one, you tie each of the knots on your first row from left to right. Tie strands all together with an overhand knot 3″ down and secure to fabric with a safety pin or to a hard surface with. Web tie strands all together with an overhand knot 3″ down and secure to fabric with a safety pin or to a hard surface with tape. Once you do all of these knots, move on to the second row. Work with 2 strings at a time, as friendship bracelet patterns use pairs to create knots. Lay out the colors in. Move from left to right when reading a friendship bracelet pattern. Decoding the friendship bracelet pattern. Lay out the colors in your desired color. Alternate tying knots with the outer string around the base string to give this bracelet design a zipper look. You can choose to only see results with photos and then check ’em out. Arrange the strings in the color order indicated by the letters at the top of the pattern. If you read a pattern row by row, you will follow the pattern as if you were reading, from left to right. The numbers on the sides indicate the rows. Secure the tail of the bracelet to a tabletop with masking tape, clip. Cut 32+” of omegacryl yarn or embroidery floss for each strand indicated at the top of the pattern underneath the capital letters. Web how to read a friendship bracelet pattern. You can also use a safety pin to secure the knot to your jeans. Arrange the strings in the color order indicated by the letters at the top of the. In row one, you tie each of the knots on your first row from left to right. If you read a pattern row by row, you will follow the pattern as if you were reading, from left to right. Move from left to right when reading a friendship bracelet pattern. Alternate tying knots with the outer string around the base string to give this bracelet design a zipper look. You can choose to only see results with photos and then check ’em out. The numbers on the sides indicate the rows. Cut 32+” of omegacryl yarn or embroidery floss for each strand indicated at the top of the pattern underneath the capital letters. Typically i select my patterns based off of photos of completed patterns. You can also use a safety pin to secure the knot to your jeans. You can search by keyword, like chevron, number of strings, number of colors, difficulty and all of that good stuff. Lay out the colors in your desired color. Secure the tail of the bracelet to a tabletop with masking tape, clip the tail of the bracelet in a clipboard. Web how to read a friendship bracelet pattern. Lay out the colors in your desired color order according to the order indicated by the letters on the top of the pattern. Decoding the friendship bracelet pattern. Once you do all of these knots, move on to the second row.
How to Read Friendship Bracelet Patterns Sarah Maker

How to read friendship bracelet patterns Artofit

How to Read Friendship Bracelet Patterns Sarah Maker

How to read bracelet patterns Jewelry friendship bracelets Pint…

How to read a friendship bracelet pattern An immersive guide by Flora

how to read alpha patterns tutorial Diy friendship bracelets
How to Read a Friendship Bracelet Pattern YouTube

How to read friendship bracelet patterns Artofit

How to Read Friendship Bracelet Patterns Dream a Little Bigger

How I read Friendship Bracelet Patterns! YouTube
Web Tie Strands All Together With An Overhand Knot 3″ Down And Secure To Fabric With A Safety Pin Or To A Hard Surface With Tape.
You’ll Work Through The Pattern One Row At A Time.
You Can Use Embroidery Floss Or Thicker Hemp Or Yarn For A Chunkier Look.
Work With 2 Strings At A Time, As Friendship Bracelet Patterns Use Pairs To Create Knots.
Related Post: